
How to Verify Github Commits for Secure Contributions
Learn how to verify GitHub commits with quick guide. Enhance code integrity and build trust in your contributions by signing commits using GPG keys.

Commit Verficiation
Commit verification is a process that allows GitHub to verify that your commits are truly authored by you. This is done by signing your commits with a GPG, SSH, or S/MIME key.
In today's collaborative coding environments, ensuring that your commits are verified on GitHub is essential. Verified commits provide confidence that the changes were indeed made by you, the author.

Commit verification is a fundamental aspect of modern version control systems. It ensures that code changes are authentic and that the integrity of the codebase is maintained. This process is crucial for building trust in collaborative software development environments.
Vigilant Mode
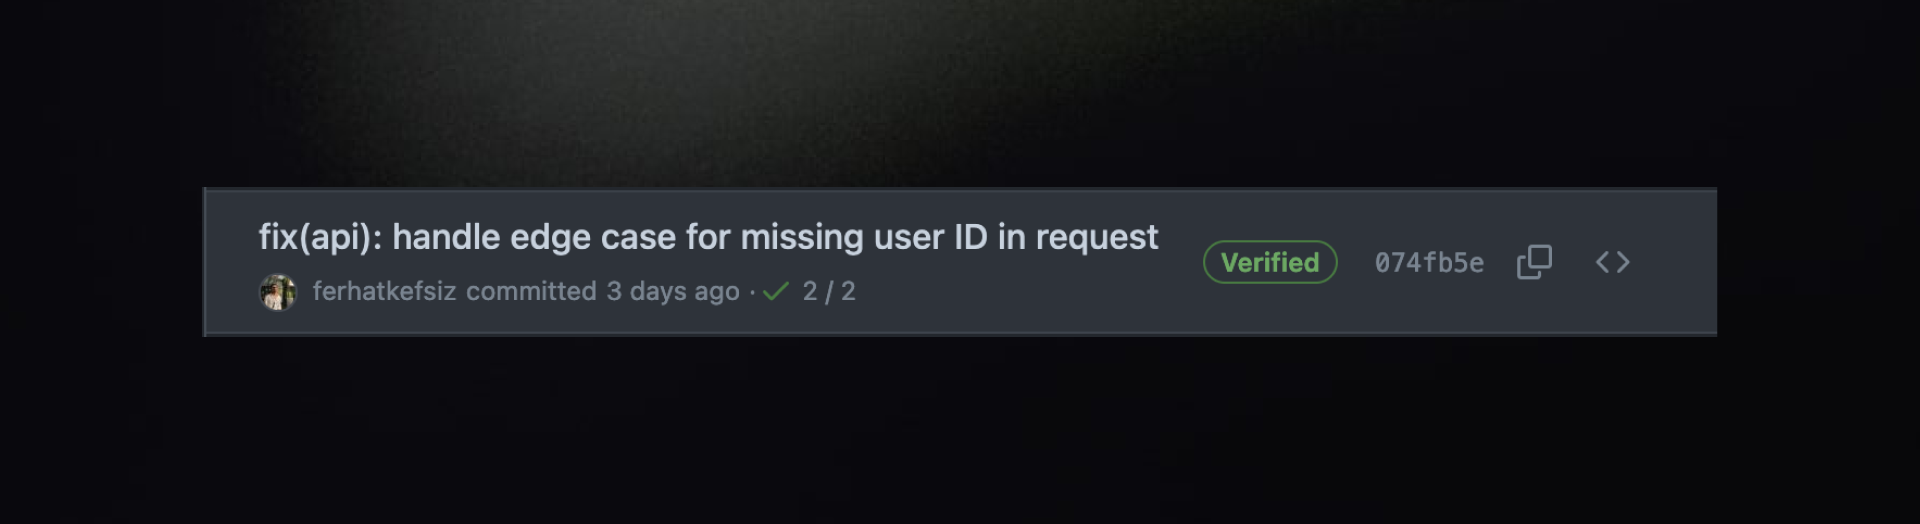
Vigilant mode is an extra layer of security that you can enable in your GitHub settings. When vigilant mode is active, all your commits and tags will be marked with one of the following statuses:
- Verified: The commit is signed, the signature is verified, and you are the only author.
- Partially Verified: The commit is signed and verified, but there are additional authors involved.
- Unverified: The commit is either unsigned or the signature could not be verified.
Generating and Adding a GPG Key
If you don't have an existing GPG key, you can generate a new one to use for signing commits and tags. Once you have your key, you'll need to add it to your GitHub account to configure your account to use the new (or existing) GPG key.
If you don't have an existing GPG key, here's a quick overview of how to do this:
- Install GPG on your computer via brew.
Run: gpg --version in the terminal to check you have the right version.
- Open your terminal and generate a new GPG key by running:
This will start an interactive wizard. The first one is that;
I recommend accepting the default option, RSA and RSA, by hitting (1) Enter.
Again for here, I'd recommend accepting the default key size, 3072, confirm by hitting (3072) Enter.
We are asked to set the lifetime of the key as day, week, month, year or to set it so that it does not expire. I recommend setting it to a year expiration by hitting (1y) Enter.
so now you have confirm the expiration date by hitting y Enter. then you need to provide identity, which will be used as part of the key. Enter your name and email in the real name and email section and confirm by hitting Enter.
After that you will be also asked for a comment, you can leave it empty and hit Enter. Then you will be asked for a passphrase, which will be used to protect your key. Enter a passphrase and confirm by hitting Enter.
After completing the key generation wizard, you will be presented with an output in the command line describing the key you just created. The information includes the key ID, the public key, the expiry date and the user ID.
- Add your GPG key to your GitHub account.
Now that you have created your key and need to obtain the ID of the key you want to use, to do that list the keys in the long form executing the following command:
you will see the ID of the key you can use this ID to export the public key which you will use to associated the key you just generated with your GitHub account.
To export the public key, execute
you will see the public key in the terminal;
Add GPG key to GitHub
Copy the key and go to your GitHub account settings, then click on the SSH and GPG keys, then click on the new GPG key button, paste the key and save it.
Configure git to sign commits
Up to this point you have created a key and associated it with your GitHub account. Now you need to configure git to sign commits with the key you just created.
You can either set the configuration at the global level or at the repository level. I'd recommend setting it at the repository level, so that you can have different keys for different repositories.
To set the configuration at the repository level, navigate to the repository you want to sign commits with the key you just created and run the following command:
If you really want to set the configuration globally, remove the --local flag from the commands above.
Then you can enable commit signing and tell git which key to use